
Kwik Klik Slide drop seeder instructions
The Kwik Klik Slide is the latest version of the Kwik Klik drop seeder. The handle is gone, which makes it lighter and simpler: fill the top plate, line it up over your tray, and slide the plate to drop seed into every cell at once. This page covers plate setup, seeding, the optional legs and spring pins, troubleshooting, and a plate chart for common crops.
How the Kwik Klik works
The Kwik Klik frame needs both a Top Plate and a Bottom Plate. Both plates must match the number and pattern of cells in your tray (50, 72, 128, 264 and so on). The thickness of the Top Plate and the diameter of its holes are matched to the seed you are planting.
What controls seeds per cell
- Tray cell pattern (50, 72, 128, etc.)
- Plate thickness
- Hole diameter
Rule of thumb: thin plate + small hole = fewer seeds. Thick plate + large hole = more seeds.
Compatible trays
- Paperpot trays (264 cell)
- Standard trays (50, 72, 128 and 200 cell)
- Microgreen 1020 trays and microgreen Paperpot trays
- Winstrip trays (50, 72 and 128 cell)
- Oasis cubes, Proptek trays and more
The included Seed Plate Guides let you test your seed before choosing plates. There is one guide for each of the most common Top Plate thicknesses: 1.5 mm and 3 mm. Need a plate for a different tray or seed? Email hello@moderngrower.co about a custom plate, or see the add-on plate package.
How to choose the right plate
- Decide how many seeds you want per cell.
- Test your seed in the Seed Plate Guide holes.
- If seeds don’t fit, use a bigger hole or a thicker plate.
- If too many seeds fit, use a smaller hole or a thinner plate.
- Record the plate thickness and hole size that worked.
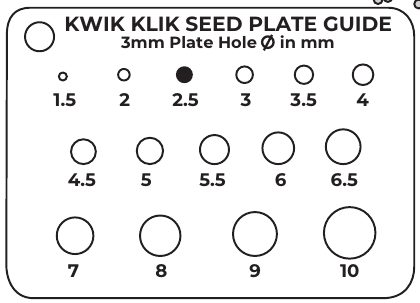
Starting settings for common crops are in the crop plate chart below.
Prepare and store your seed plates
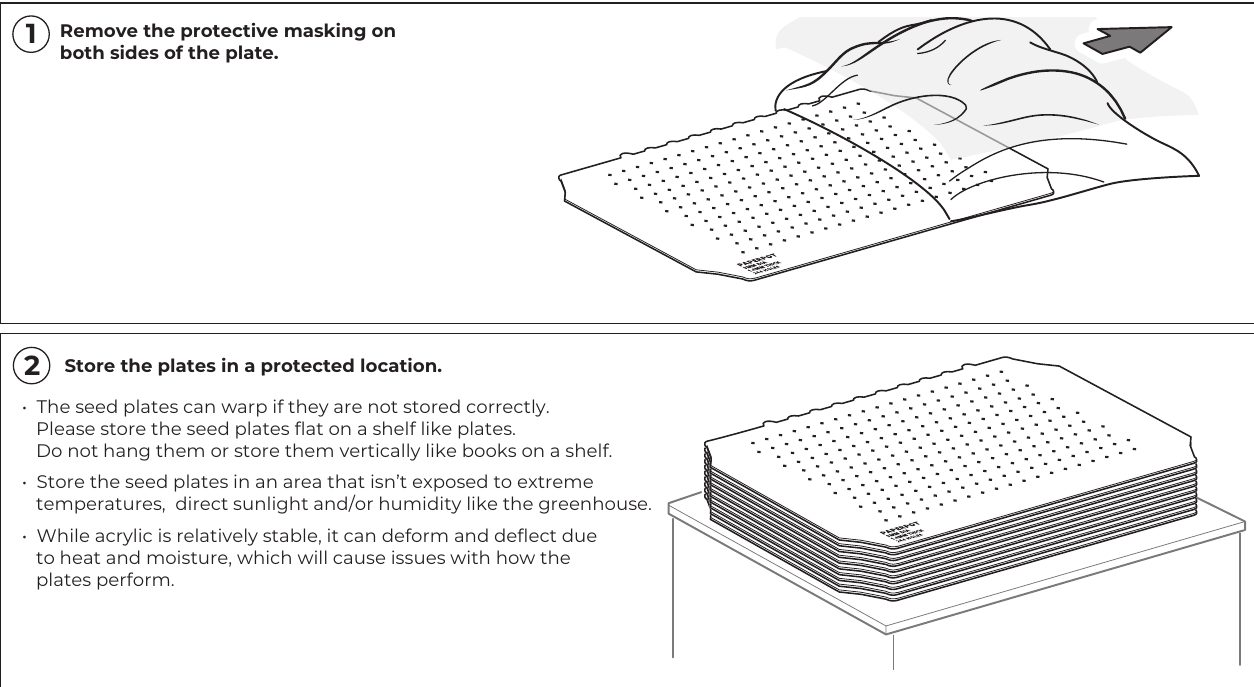
- Remove the protective masking from both sides of each plate.
- Store plates flat in a protected spot. Stack them flat on a shelf like dinner plates. Don’t hang them or stand them on edge like books. Keep them out of extreme heat, direct sun and humidity (like a greenhouse). Acrylic is fairly stable, but heat and moisture can warp it, and a warped plate won’t seed accurately.
Install the plates
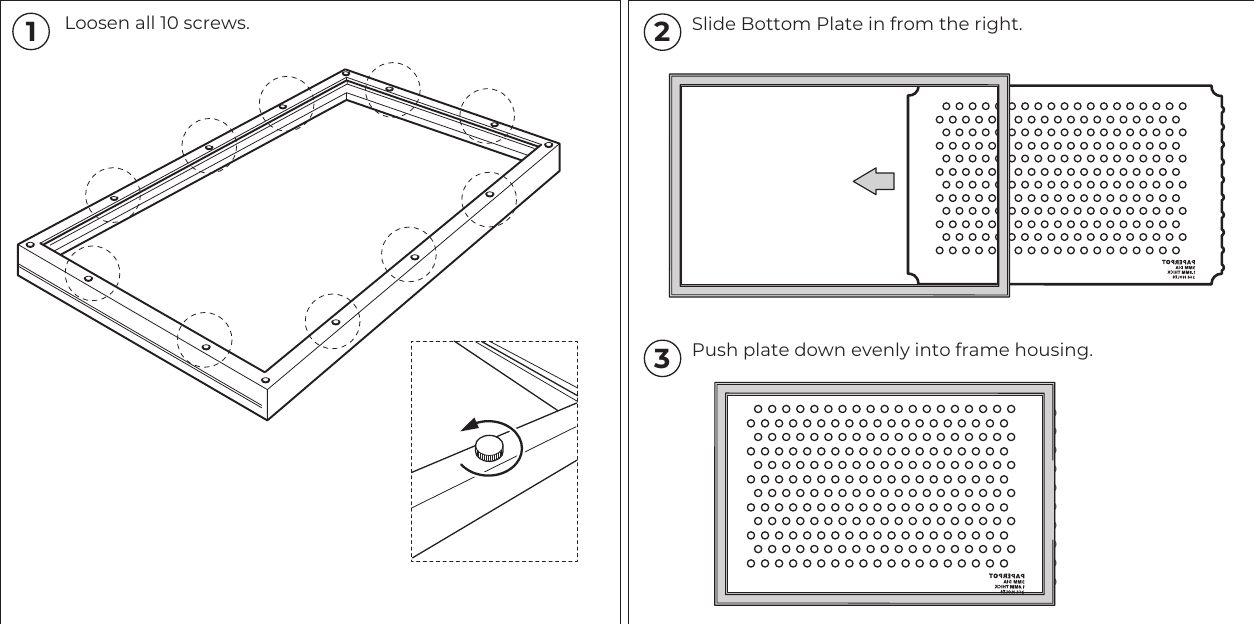
Bottom Plate
- Loosen all 10 screws.
- Slide the Bottom Plate in from the right.
- Push the plate down evenly into the frame housing.
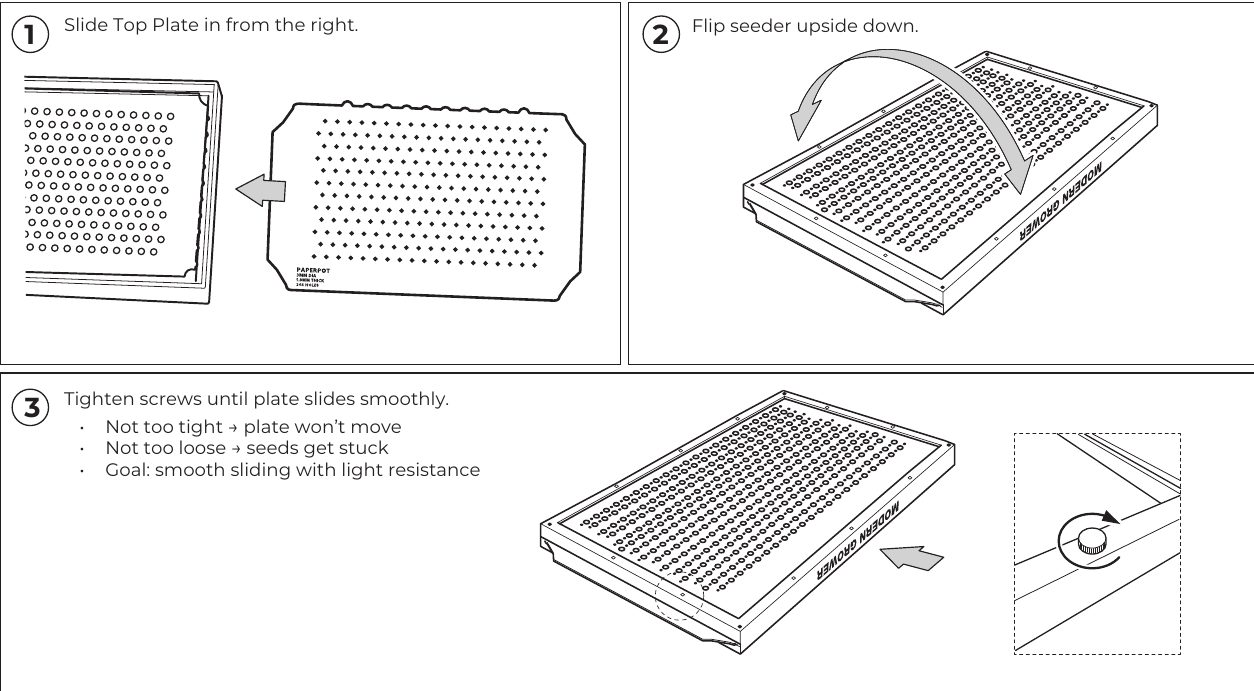
Top Plate
- Slide the Top Plate in from the right.
- Flip the seeder upside down.
- Tighten the screws until the plate slides smoothly. Too tight and the plate won’t move; too loose and seeds get stuck. You want smooth sliding with light resistance.
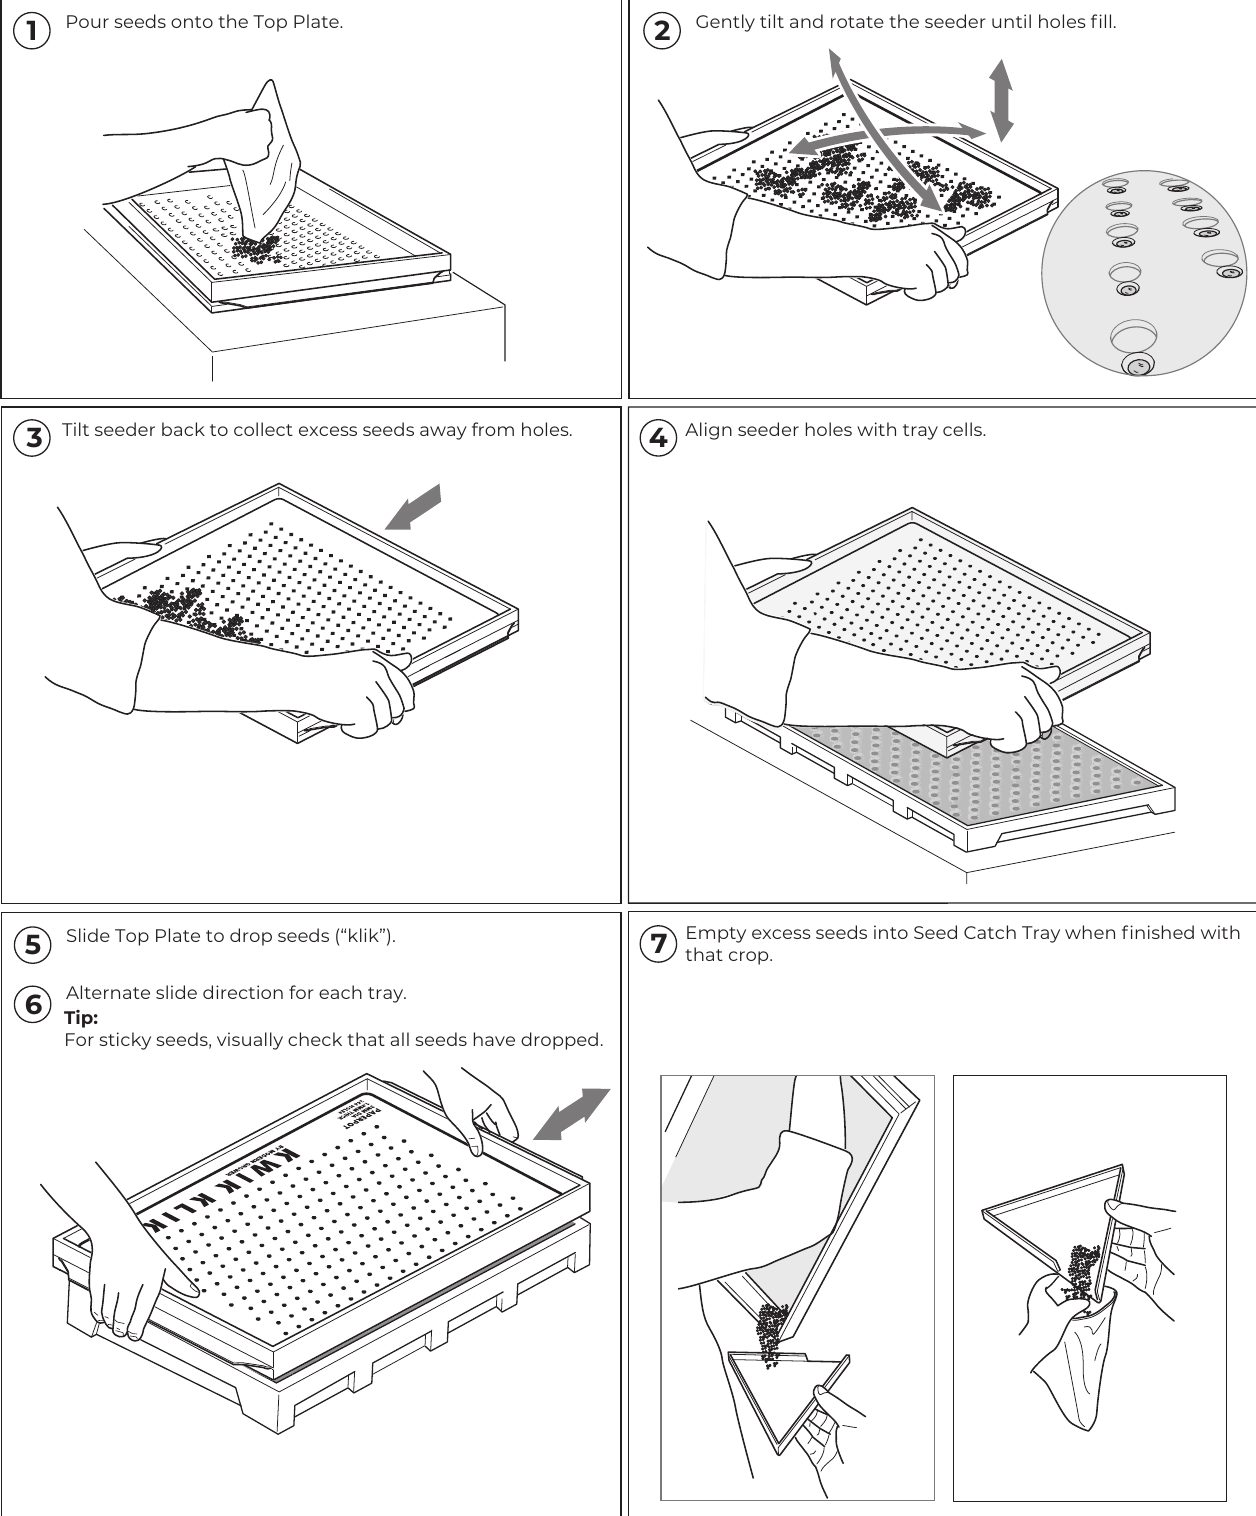
Seed a tray with the Kwik Klik
- Pour seeds onto the Top Plate.
- Gently tilt and rotate the seeder until every hole is filled.
- Tilt the seeder back to collect the extra seed away from the holes.
- Line up the seeder holes with the tray cells.
- Slide the Top Plate to drop the seeds (the “klik”).
- Alternate the slide direction for each tray. For sticky seeds, check that every seed has dropped.
- When you finish a crop, empty the extra seed into the Seed Catch Tray.
Leg extensions
Pros
- Keeps the frame clean
- Reduces plate scratching
- Less hand support needed
Cons
- May reduce accuracy for some users
- Seeds may bounce when dropped
- Adds weight
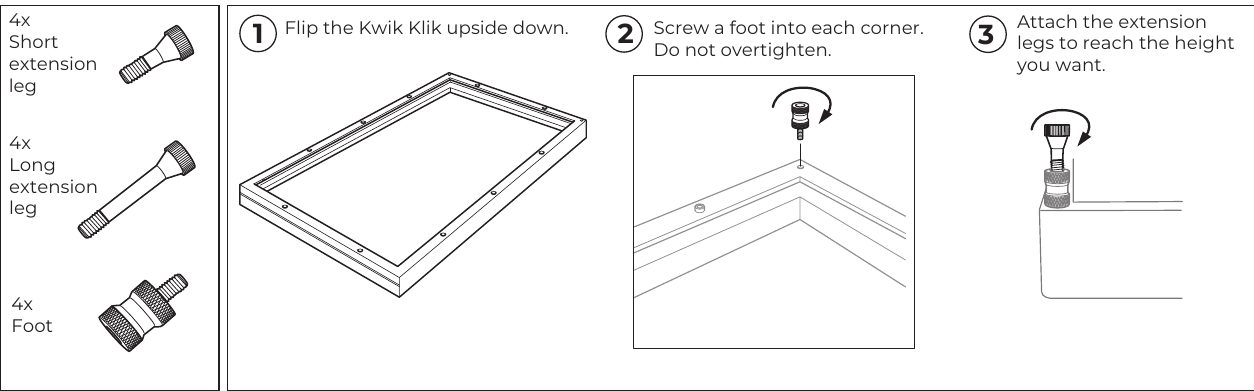
The kit includes 4 short extension legs, 4 long extension legs and 4 feet.
- Flip the Kwik Klik upside down.
- Screw a foot into each corner. Don’t overtighten.
- Attach extension legs to reach the height you want.
Spring pins
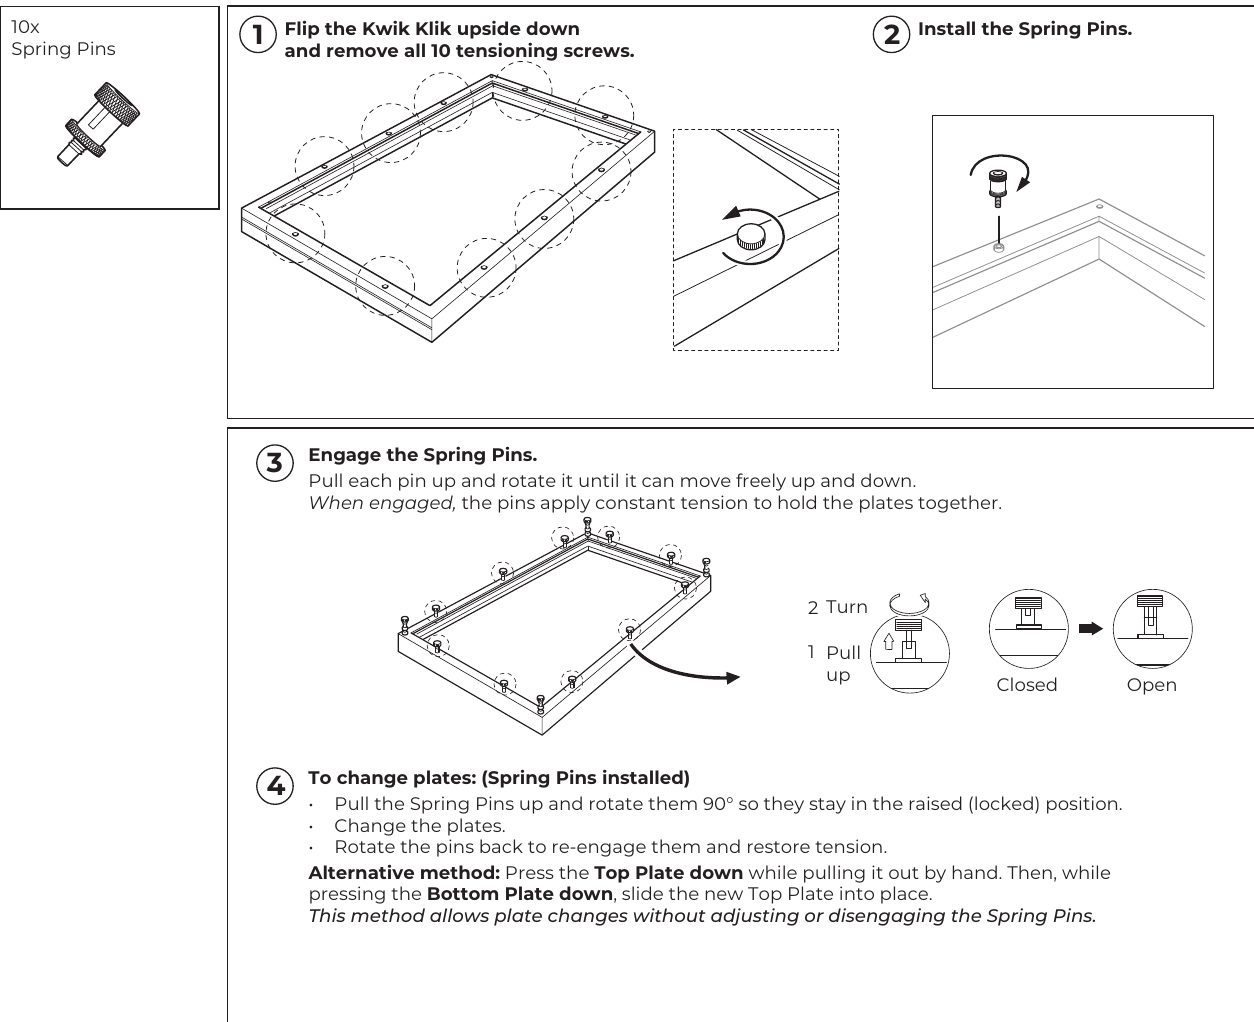
The 10 spring pins replace the tensioning screws and hold the plates together with constant tension.
- Flip the Kwik Klik upside down and remove all 10 tensioning screws.
- Install the spring pins.
- Engage the pins: pull each pin up and rotate it until it moves freely up and down. When engaged, the pins keep the plates pressed together.
- To change plates: pull the pins up and rotate them 90° so they stay raised, change the plates, then rotate the pins back to restore tension.
Faster plate changes: press the Top Plate down while pulling it out by hand. Then, while pressing the Bottom Plate down, slide the new Top Plate into place. This works without disengaging the spring pins.
Common problems and fixes
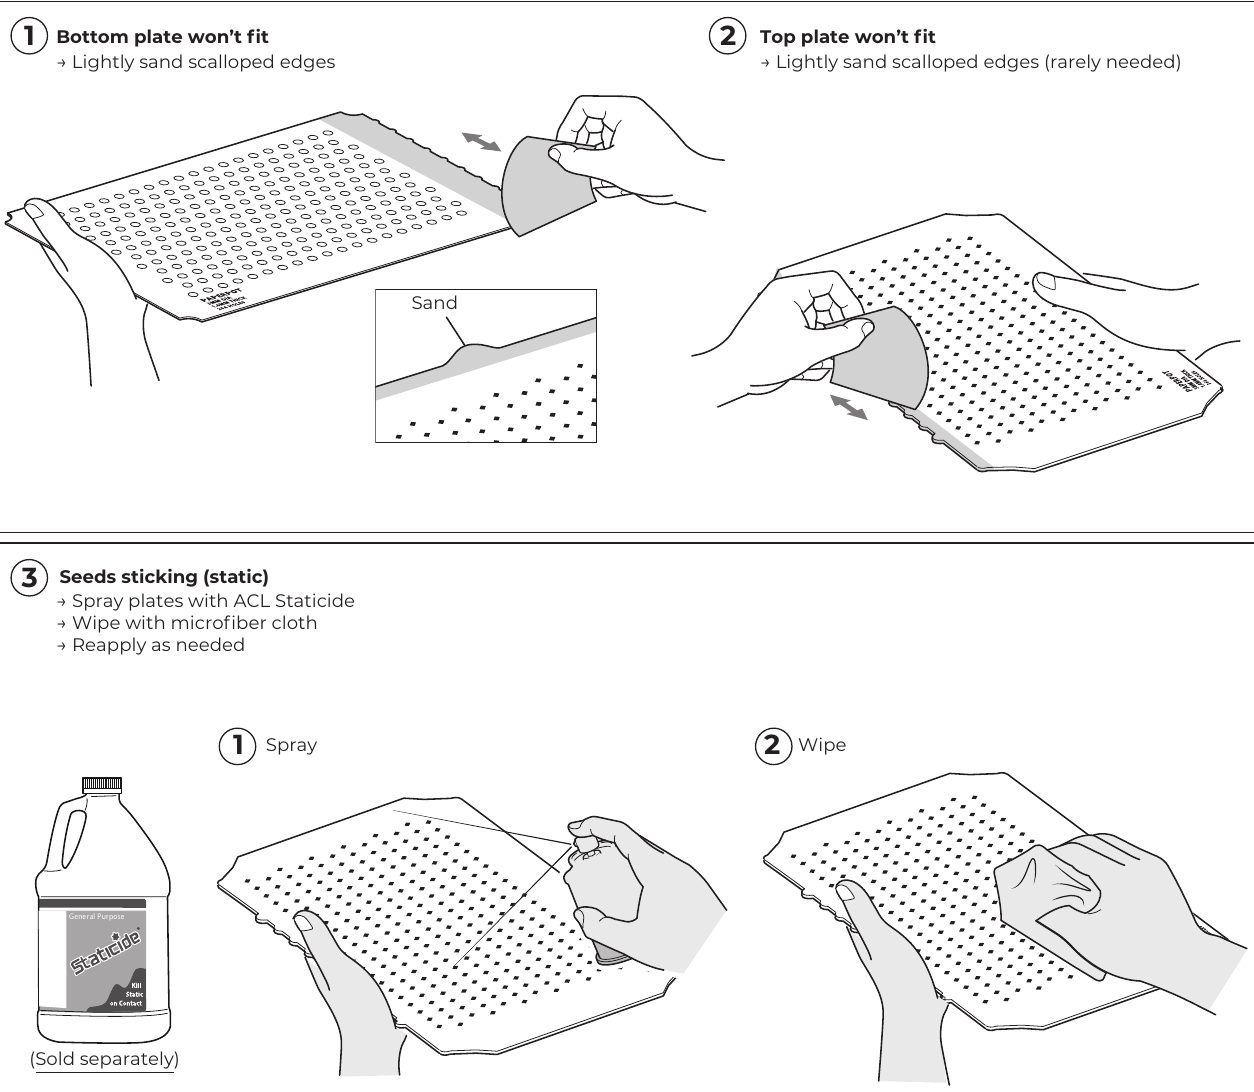
The Bottom Plate won’t fit
Lightly sand the scalloped edges of the plate.
The Top Plate won’t fit
Lightly sand the scalloped edges. This is rarely needed.
Seeds are sticking to the plate (static)
Spray the plates with ACL Staticide (sold separately), wipe with a microfiber cloth, and reapply as needed. The crop chart below shows which seeds usually need it.
The plate is hard to slide, or seeds jam
Adjust the screw tension: the plate should slide smoothly with light resistance. Too tight and it won’t move; too loose and seeds get caught between the plates.
Kwik Klik plate chart by crop
Starting plate settings for common crops. Plate thickness and hole diameter are in millimeters. Test with your own seed lot, since seed size varies by variety and supplier.
| Crop | Single / multiple | Pelleted | Plate thickness (mm) | Hole diameter (mm) | Seeds per cell | Staticide recommended | Pelleted preferred |
|---|---|---|---|---|---|---|---|
| Arugula | Small cluster | N | 1.5 | 2.5 | 2-3 | Y | |
| Arugula | Large cluster | N | 3.0 | 3.0 | 8 | Y | |
| Basil | Small cluster | N | 1.5 | 2.5 | 2 | Y | |
| Basil | Large cluster | N | 3.0 | 3.0 | 7 | Y | |
| Basil | Single | Y | 3.0 | 4.0 | 1 | N | |
| Beet | Single | N | 3.0 | 5.0 | 1 | N | |
| Beet | Single | Y | 3.0 | 6.0 | 1 | N | |
| Broccoli | Single | N | 1.5 | 2.5 | 1 | Y | |
| Carrots | Single | Y | 3.0 | 4.0 | 1 | N | Y |
| Celery | Single | Y | 1.5 | 2.5 | 1 | N | |
| Celery | Varies | N | Hand seed | Varies | – | Y | |
| Chard | Single | N | 3.0 | 4.5 | 1 | N | |
| Cilantro | Single | N | 3.0 | 5.0 | 1 | N | |
| Cilantro | Small cluster | N | 3.0 | 7.0 | 2-3 | N | |
| Dill | Varies | N | Hand seed | Varies | – | Y | |
| Fennel | Single | Y | 3.0 | 5.0 | 1 | N | Y |
| Green onion / scallions | Single | N | 1.5 | 2.5 | 1 | N | |
| Green onion / scallions | Small cluster | N | 3.0 | 3.0 | 3-4 | N | |
| Kale | Single | N | 1.5 | 2.5 | 1 | Y | |
| Kale | Small cluster | N | 3.0 | 3.0 | 2-4 | Y | |
| Leek | Single | N | 1.5 | 2.5 | 1 | N | |
| Leek | Small cluster | N | 3.0 | 3.0 | 3-4 | N | |
| Lettuce (head) | Varies | N | Hand seed | 1 | – | Y | |
| Lettuce (loose leaf) | Varies | N | Hand seed | Varies | – | Y | |
| Onion | Single | N | 1.5 | 3.0 | 1 | N | |
| Onion | Small cluster | N | 3.0 | 3.0 | 2 | N | |
| Peas | Varies | N | Hand seed | Varies | – | ||
| Radish | Single | N | 1.5 | 3.0 | 1 | N | |
| Radish | Small cluster | N | 3.0 | 3.0 | 2 | N | |
| Salanova | Single | Y | 3.0 | 5.0 | 1 | N | Y |
| Shallots | Single | N | 1.5 | 3.0 | 1 | N | |
| Shallots | Small cluster | N | 3.0 | 3.0 | 2 | N | |
| Spinach | Single | N | 3.0 | 5.0 | 1 | N | |
| Spinach | Small cluster | N | 3.0 | 7.0 | 3 | N | |
| Turnip | Single | N | 1.5 | 2.0 | 1 | Y | |
| Turnip | Small cluster | N | 3.0 | 3.0 | 4 | Y | |
We’re happy to help
Email hello@moderngrower.co with questions or for a custom plate. You can also download these instructions as a PDF.