How to plant the most common vegetable crops using the Paperpot Transplanter?
Figuring out where to start when it comes to using the Paperpot system can be tough.
To make things easier we created the Paperpot Co. Growers Notes to get you successfully started with the Paperpot transplanter.
The Growers Notes cover everything you need to get going with a Paperpot transplanter, from recommended plant cultivars to soil preparation to harvesting.
Use the information in these notes as a jumping-off point; you can adjust as needed based on your local conditions.
Download all of the Paperpot Transplanter Growers Notes here.
First Things, First. Why Use a Paperpot transplanter?
One person? No problem!
The paperpot transplanter allows a single person to transplant 264 plants covering over 85ft in just minutes. What used to take hours, now takes minutes. Allowing you to spend less time transplanting crops, and more time doing other things like farm improvements, marketing, sales, or just taking some time off.
No more bending over!
Forget spending hours bending over a bed transplanting plugs one by one. That’s an inefficient waste of time which puts a lot of wear and tear on your body week after week season after season. Transplant those same seedlings standing vertically walking down the bed with the paperpot transplanter. Your back will thank you.
Decrease crop loss
Get transplants into the ground and watered exponentially faster cutting down heat stress and transplant shock.
Versatile
The paperpot transplanter can be used on a variety of crops from salad greens to onions to radishes to peas and beans.
How Do I Use the Paperpot Transplanter to Plant My Crop?
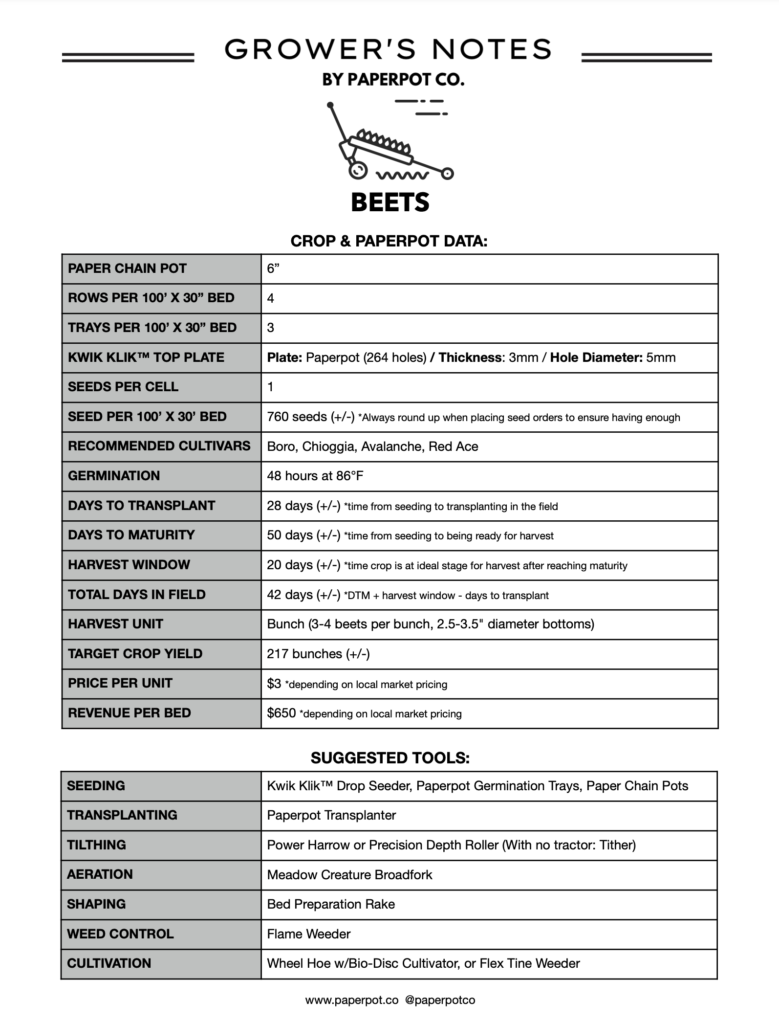
To answer this question, let’s walk through a sample of the Growers Notes for beets.
At the very top of each set of notes, you will find the basic Paperpot settings.
- Paper Chain Pot: 6”
- Rows per 100’ by 30” Bed: 4
- Trays per 100’ by 30” Bed: 3
- Kwik Klik™ Top Plate: Paperpot (264 holes) / Thickness: 3mm / Hole Diameter: 5mm
- Seeds per Cell: 1
- Seed per 100’ by 30’ Bed: 760 seeds (+/-) *Always round up when placing seed orders to ensure having enough
Next, we cover the recommended cultivars. These are proven varieties that have shown themselves to be productive on multiple farms throughout North America.
Recommended Cultivars: Boro, Chioggia, Avalanche, Red Ace
To help with nursery and field planning we’ve also included the estimated Days to Transplant, Days to Maturity, and Target Crop Yield. This will give you an idea of how large of a harvest to expect and when.
- Days to Transplant: 28 days (+/-) *time from seeding to transplanting in the field
- Days to Maturity: 50 days (+/-) *time from seeding to being ready for harvest
- Harvest Window: 20 days (+/-) *time crop is at the ideal stage for harvest after reaching maturity
- Total Days in Field: 42 days (+/-) *DTM + harvest window – days to transplant
- Harvest Unit: Bunch (3-4 beets per bunch, 2.5-3.5″ diameter bottoms)
- Target Crop Yield: 217 bunches (+/-)
Like any great farm tool, the Paperpot system doesn’t exist in a vacuum; it and requires other tools to work successfully. All of the listed tools help create the best conditions for seeding and for growing the crop after it has been seeded.
Tools Needed:
- Tilthing: Power Harrow or Precision Depth Roller (With no tractor: Tither)
- Aeration: Meadow Creature Broadfork
- Shaping: Bed Preparation Rake
- Weed Control: Flame Weeder
- Cultivation: Wheel Hoe w/Bio-Disc Cultivator, or Flex Tine Weeder
Now that you know the correct seeder settings and tools that are needed, you can put them to work.
Each Growers Note walks you through all of the steps from bed preparation to washing and packing. Below are the Growers Note instructions for beets.
BED PREPARATION
-
- Broadfork the bed to aerate and loosen the soil.
- Smooth and shape the bed with a bed preparation rake, removing any debris.
- Beets will do well in beds freshly amended with fertilizer. Here are two options:
- 1) Layer on 1” of compost, enough to mostly cover the native soil.
- 2) Sprinkle on a combination of alfalfa meal and pelleted chicken manure.
- If layering compost, do not tilth in hopes of smothering any surface weed seed.
- If adding amendments, tilth the top 1-2” of soil to mix in amendments.
- Calcium and Boron are also important amendments for beets. Without sufficient boron, beet growth suffers and the roots develop internal black spots.
- Irrigate for 10-14 days*, allowing any weed seed in top layer of soil to germinate.
- Flame weed the bed when the cotyledons of the weed seeds have emerged.
SEEDING
-
- Prepare trays with 6” paper chain pots, and fill with potting mix.
- Install Paperpot bottom plate and specified top plate into Kwik Klik™ (KK) Drop Seeder.
- Pour seed onto top plate and rotate until one seed fills each hole.
- Position the KK Drop Seeder over the tray, ensuring the holes are lined up with the cells and click to drop the seeds.
- Water the trays, then place in germination chamber for 48 hours at 86°.
- Transfer the trays to greenhouse tables after germination.
TRANSPLANTING
-
- Thoroughly water trays before heading to the field for transplanting.
- Using the Paperpot Transplanter, plant the four rows of beets.
- There should be 6” between rows with 3” from the outer rows to the edge of the bed.
- Reference https://paperpot.co/learn/ for instructional videos if needed.
IRRIGATION
-
- Water the beds thoroughly with overhead irrigation, or four rows of drip.
- Not enough water during the warm season causes the plants to bolt and the beet roots to crack and become tough.
- Frequent shallow waterings will help maintain flavor and support rapid growth.
CULTIVATION
-
- 10-14 days after transplanting, cultivate using a Terrateck Wheel Hoe with the bio-disc cultivator attachment. This tool will cultivate both on the row and in between rows in a single pass. Repeat 7-10 days later.
- A weekly pass with the flex tine weeder is also an effective tool for preventing weeds.
HARVEST
-
- Baby beets are ready for harvest when the bottoms are 2.5-3.5”.
- Harvest in the kneeling position, bunching 3-4 beets together.
- Remove yellows leaves and discard any misshapen/damaged beets in the field while bunching.
WASHING AND PACKING
-
- Using a Washdown Gun sprayer over a root wash table, spray each bunch while rotating until all soil is thoroughly cleaned off.
- Transfer the washed bunches to totes, and store at 35° until taken to market.
SAMPLE PAPERPOT GROWERS NOTES
DOWNLOAD ALL OF THE PAPERPOT GROWERS NOTES
- Basil
- Beets
- Bunching Onions
- Cabbage
- Cilantro
- Dill
- Fennel
- Garlic
- Head Lettuce
- Kohlrabi
- Leeks
- Little Gem Lettuce
- Mesclun Mix Lettuce (Salanova)
- Onions
- Peas
- Salad Turnips
- Storage Radishes
- Spinach
- Summer Crisp Lettuce
The Growers Notes were developed in partnership with farmers Erich Schultz of Steadfast Farm and Seth Davis.
We hope that these Growers Notes will be a great starting point for market gardeners.
While we tried to standardize the procedure as much as possible, it may be necessary to change steps or timing based on local conditions.
If you have any questions, please reach out to us at hello@paperpot.co or 877.850.1555.