HOW TO USE THE PAPERPOT TRANSPLANTER
The Paperpot Transplanter is an innovative tool that easily cuts down transplant work by a large margin. This tool can be used on a variety of crops from salad greens to onions to radishes to peas and beans. Some of the more experimental farmers have even used the transplanter for their bouquet flowers!
The Paperpot System allows you to quickly transplant crops, all while minimizing transplant shock and allowing you to do the work standing up. No bending over required.
Use your step-by-step guide to get started onhow to use the Paperpot Transplanter on your farm.
REQUIRED TOOLS
- Kwik Klik™ Drop Seeder
- Paperpot Opening Kit – spreader bars and frame
- Paper Chain Pots
- Paperpot Germination Trays
- Dibble Board
- Paperpot Transplanter
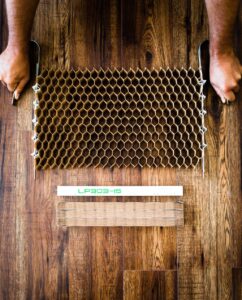
1. PREPARE PAPERPOT TRAYS
- Select the appropriate paper chain pot according to your desired crop spacing (2”, 4”, or 6”), and insert your spreader bars under the white paper tabs on either side of the paper chain, being careful not to tear the paper.
Note: It does not matter which way the writing on the paper chains is facing—either way will work. - With the spreader frame in front of you on your work surface, teeth facing up, pull apart the paper chain pots (like an accordion) using the spreader bars as handles. Keep pulling until the paper chain is approximately the width of the spreader frame.
- You’ll notice in one of the top corners of your spreader frame that there is an offset tooth. Examine the honeycomb pattern in your stretched paper chain pot and reorient it (if necessary) so as to line up the offset corner of the honeycomb with the offset tooth of the frame.
- Start with one side and position the paper chain pot honeycomb cells over the teeth of the spreader frame. Every other row will be attached to the spreader frame.
Note: If you are having trouble aligning the paper chain, it may not be stretched far enough; keeping the paper chain pot stretched the full width of the frame will help the cells to line up correctly with the teeth. - After the first side is successfully inserted on the teeth of the spreader frame, finish by placing the opposite side onto the frame as well, being careful to appropriately line up the cells with the tabs of the frame.
- After the paper chain pot haspa been successfully stretched and placed onto the frame, you can remove the spreader bars and set them aside.
- Take an empty Paperpot germination tray, flip it upside down (holes up), and place it over the frame and the expanded paper chain.
- Holding both sides of the tray AND the spreader frame, flip everything right side up.
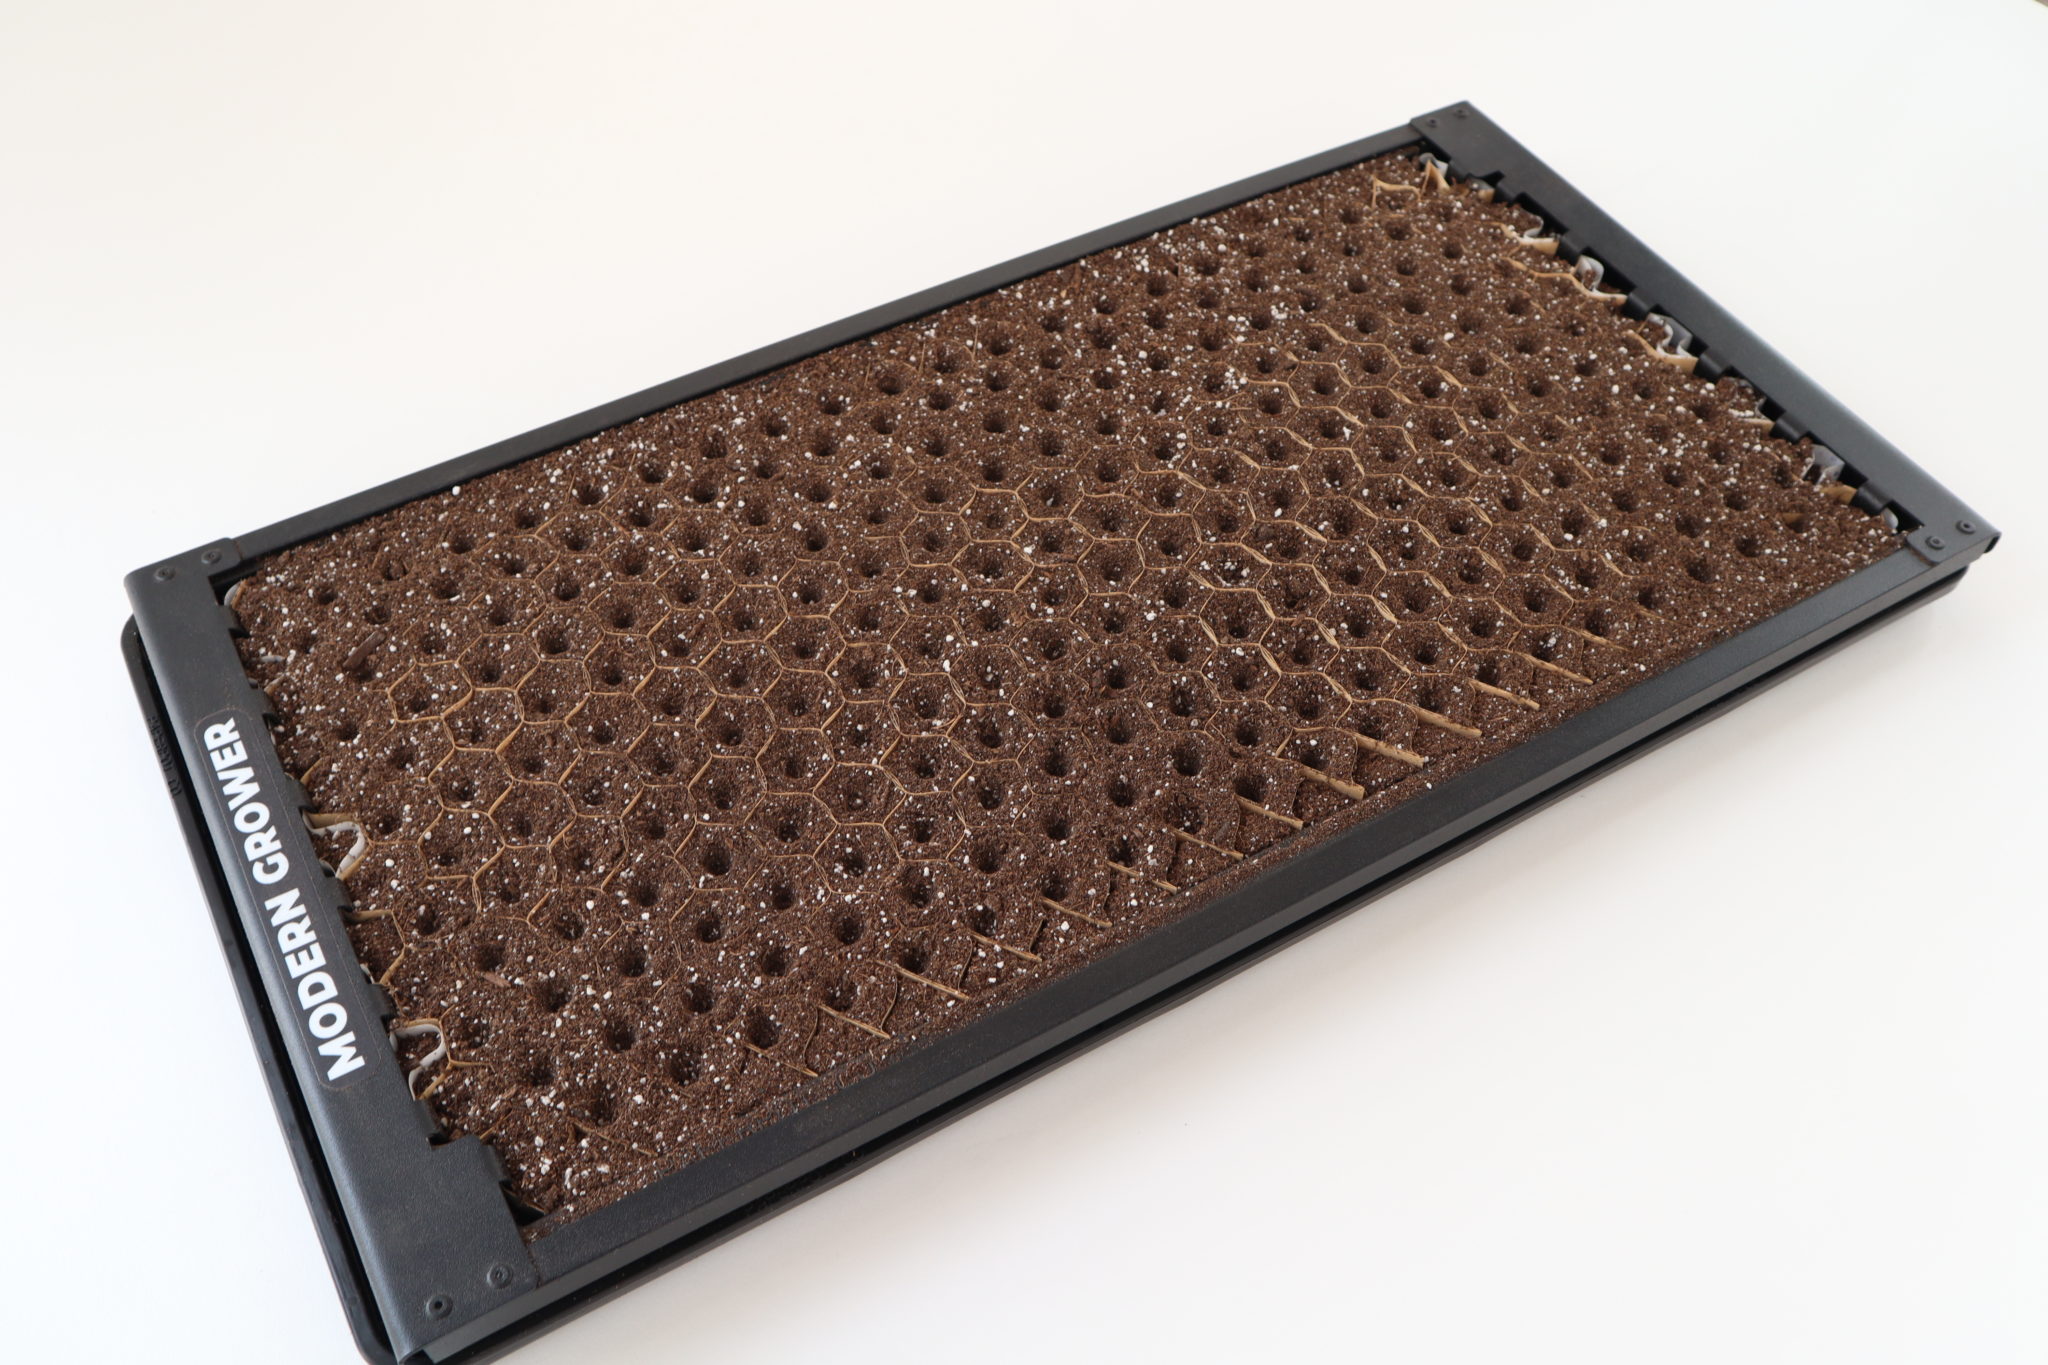
2. FILL TRAYS WITH SOIL
- We recommended that you have some moisture in your potting mix. This will help ensure that each cell is filled to its full volume, giving your transplant more room to develop its root system. Potting mix that is completely dry will compress after watering, leaving the paper chain pot cell only partially full.
- Using your hands or a scoop, pour an excess of pre-moistened potting mix over the top of your stretched paper chains. The paper chain pots are still held in place by the stretching frame at this point, allowing soil to be placed in the open cells.
- Spread the mix around with your hands in a circular motion, ensuring every cell is evenly filled. Lightly tamp the tray enough to ensure all cells are equally compressed with potting mix, but not so much that you distort the paper chain pots.
Note: Pay careful attention to the cells around the edges of the paper chain pot, as they tend to be underfilled after filling the center cells. - Wipe or brush away any excess mix from the surface. It is not necessary for the perimeter of each cell to be fully visible.
3. PREPARE TRAYS FOR SEEDING
- With the spreader frame still in place, take the dibble board and line up the top left dibble with the top left metal tooth on the frame.
- Then evenly line up the top edge of the dibble board with the top edge of the frame. With these two reference points lined up, you can assure all dibbles are centered above the cells.
- Once in position, firmly press down on the dibble board so all of the cells are indented to the maximum depth of each dibble. The tray is now ready to be seeded.
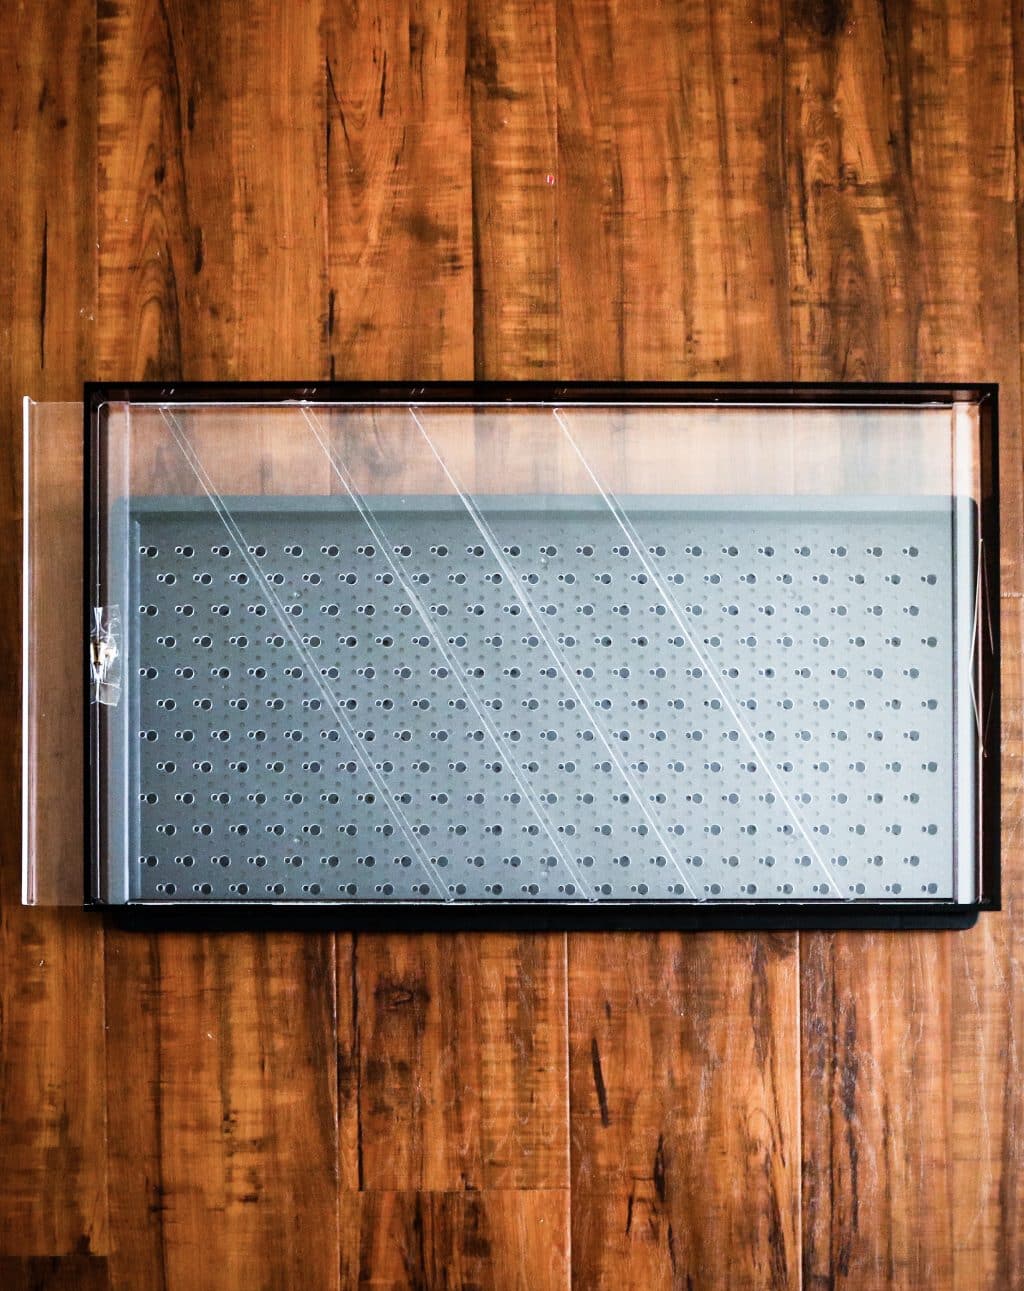
4. KWIK KLIK™ DROP SEEDER (V2) SETUP
These are the steps on how to prepare the Kwik Klik™ drop seeder with a paperpot bottom plate (264 holes) and the appropriate top plate (according to your seed size).
- To install the bottom plate, begin by backing out all eight of the brass screws on the bottom of the frame, until each screw is no longer poking through the frame.
- Do the same with the two brass screws on the back end of the seeder.
- Next, lift up the two brass spring pins on the handle by pulling up and turning counterclockwise one-quarter turn; this holds them in the up position.
- Then check that the end screws that hold the springs in are both screwed in at an equal distance.
- If using the plates for the first time, you will need to remove the blue plastic masking from BOTH sides of the plate.
- Position the frame to where the logo is facing you, and then position the bottom plate to where the imprinted text reads correctly from left to right.
- Now insert the bottom plate into the right side of the frame (under the spring-loaded handle).
- Ensure that the plate is evenly pushed down, resting inside the housing of the frame.
Note: If the plate will not clear the edge of the frame under the handle, in order to drop down, you may need to lightly sand the scalloped edges of the plate until it will fit. - Once the bottom plate is installed, tighten the two brass screws on the back end, just to where they are making contact with the edge of the plate. This will hold the bottom plate in place to prevent horizontal shifting.
- To install the top plate, the frame needs to be oriented in the same way, with the logo facing you.
- Install the top plate all the way to where the brass spring pins line up with their holes in the plate.
Note: Because each Kwik Klik™ drop seeder is assembled by hand, there is the off chance that the plate might not fit perfectly when first installed. If this is the case, you can lightly sand the scalloped edges of the plate to ensure a perfect fit. However, most plates will fit perfectly as is out of the box. - Turn each spring pin clockwise to lock them down in the appropriate holes.
- Next, turn the Kwik Klik™ drop seeder onto its side, squeeze in the side handle with one hand (holding it in the closed/drop position), and fully tighten all eight of the brass bottom screws, compressing the bottom and top plates together. This will disable the spring handle from releasing to the open position.
- Then go around to each of the brass bottom screws and loosen about a quarter turn. This will allow the spring-loaded handle to pop back out and will ensure that there is the correct amount of tension between the two plates.
Note: If the bottom screws are tightened too tightly, the top plate will not slide in and out easily. If the bottom screws are not tightened enough, then seed will get between the plates. It is important to find that balance where the bottom screws are just loose enough. - For more details and troubleshooting, refer to the Kwik Klik™ tutorial video at https://paperpot.co/kkv2/.
PAPERPOT VEGETABLE SEEDING CHART
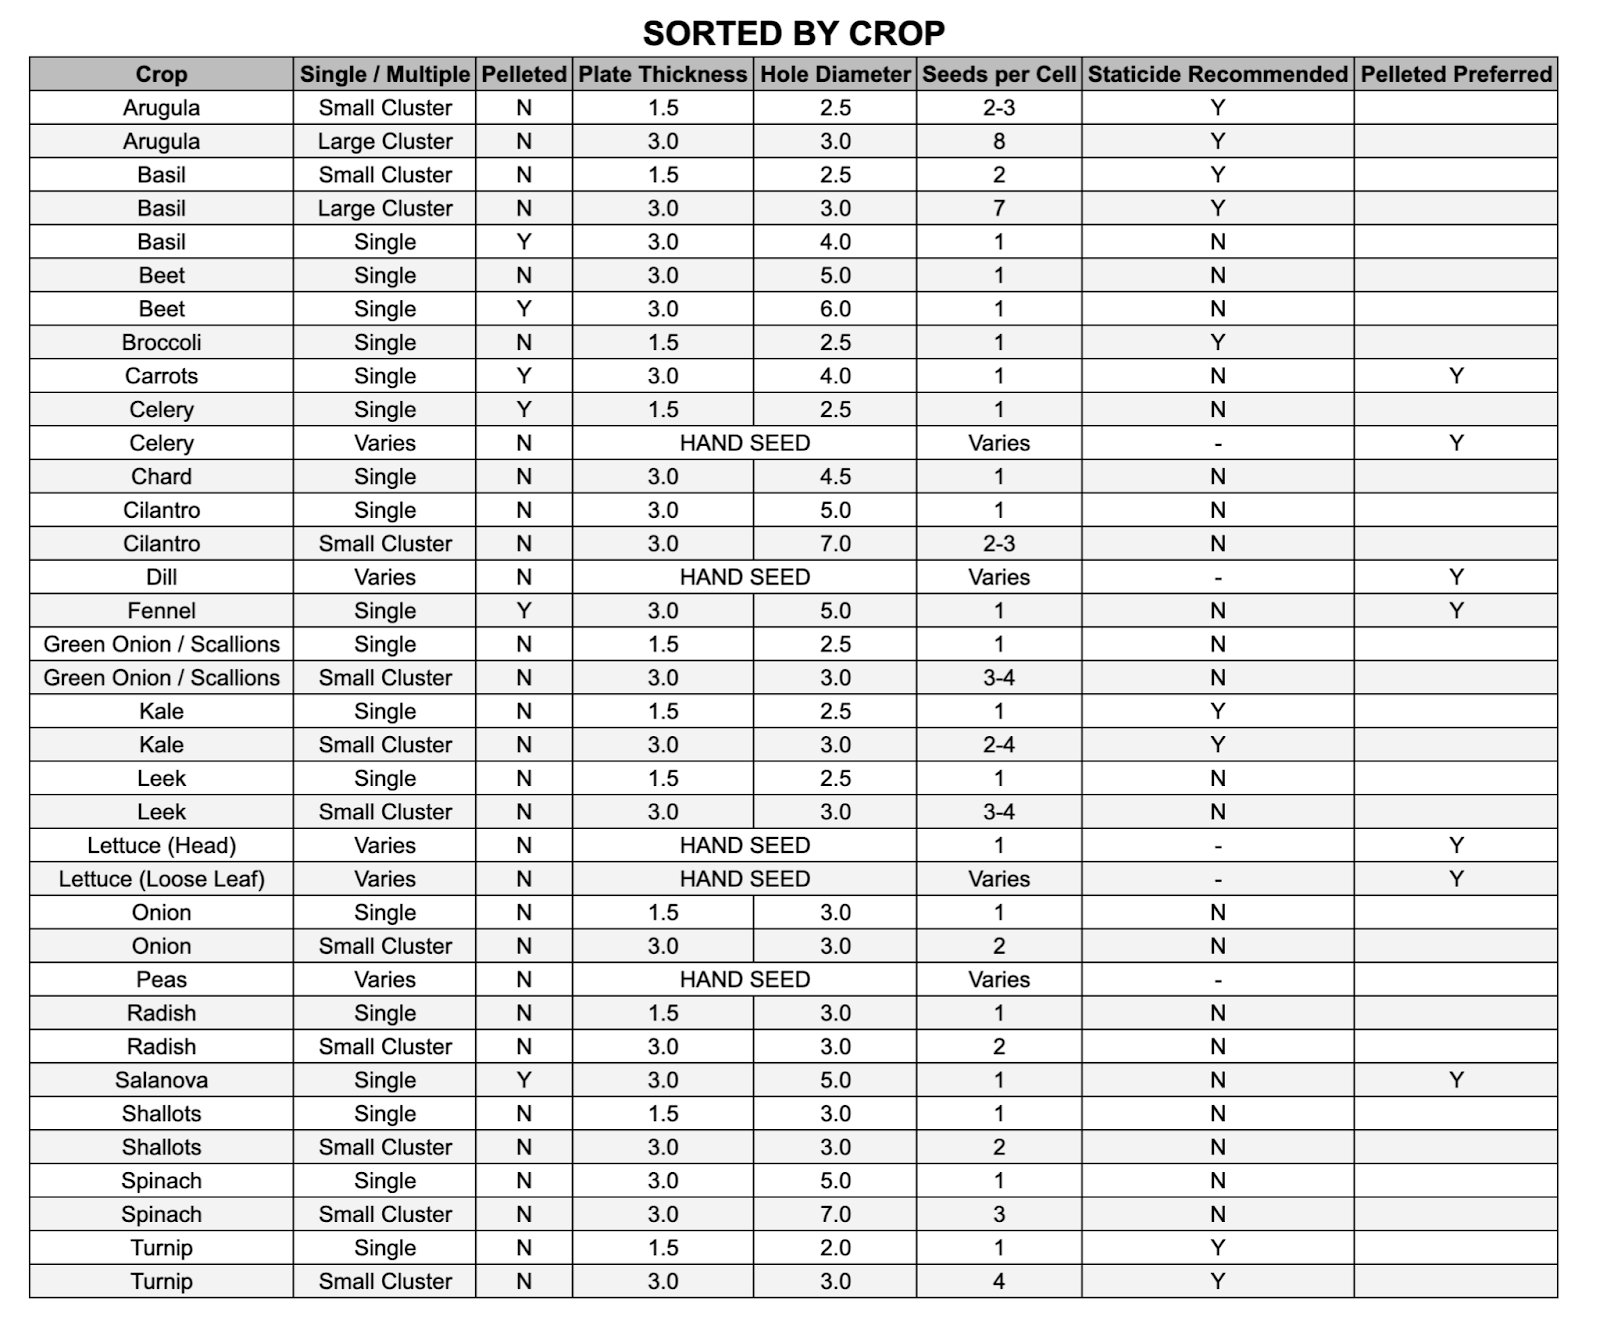
Source: https://paperpot.co/paperpot-seeding-and-planting-chart/
5. SEED TRAYS WITH THE PAPERPOT SYSTEM
- With the Kwik Klik™ drop seeder logo facing you, pour an excess of seed onto the top of the drop seeder.
- Pick up the entire drop seeder and rotate it front to back and side to side until the desired seed quantity has fallen into each of the 264 holes in the top plate.
- When all holes are filled with seed, angle the seeder back towards you so all remaining seed slides away from the seeding holes and is collected along the bottom inside edge of the seeder.
- If you are seeding more trays of the same crop, then you can leave the excess seed in the seeder.
- If you are done seeding that particular crop, then you can empty out the excess seeds by gently angling the seeder onto a single corner. This will allow you to collect all of the extra seed in one place so you can put it back into its container.
- Align the drop seeder over the tray. This is very similar to aligning the dibble board over the tray: place the top-left bottom plate hole over the cell directly next to the top-left spreader frame tooth, and then align the top edge of the seeder with the top edge of the frame. Not only is this quick and easy; it will also help you as the clear plastic becomes cloudy over time, making it difficult to visually line up each hole over each cell.
- Once positioned, you can “klik” the Kwik Klik™ drop seeder by squeezing the spring-loaded handle, dropping all seeds simultaneously into each of the 264 cells.
Note: For some seeds, that may be prone to sticking in the holes, it is a good practice to keep the handle squeezed (in the drop position) and to do a quick visual scan to ensure all seeds have dropped and that none are stuck in the holes. If some seeds are stuck, you can manually tap them through with your left hand or the tip of a pen. - Repeat the process for all subsequent trays in your planting.
Note: If static becomes an issue during seeding, we recommend using ACL Staticide.- ACL Staticide is a water-based product that you lightly spray onto the seed plates and then wipe off. The residue helps minimize static. Reapply as needed.
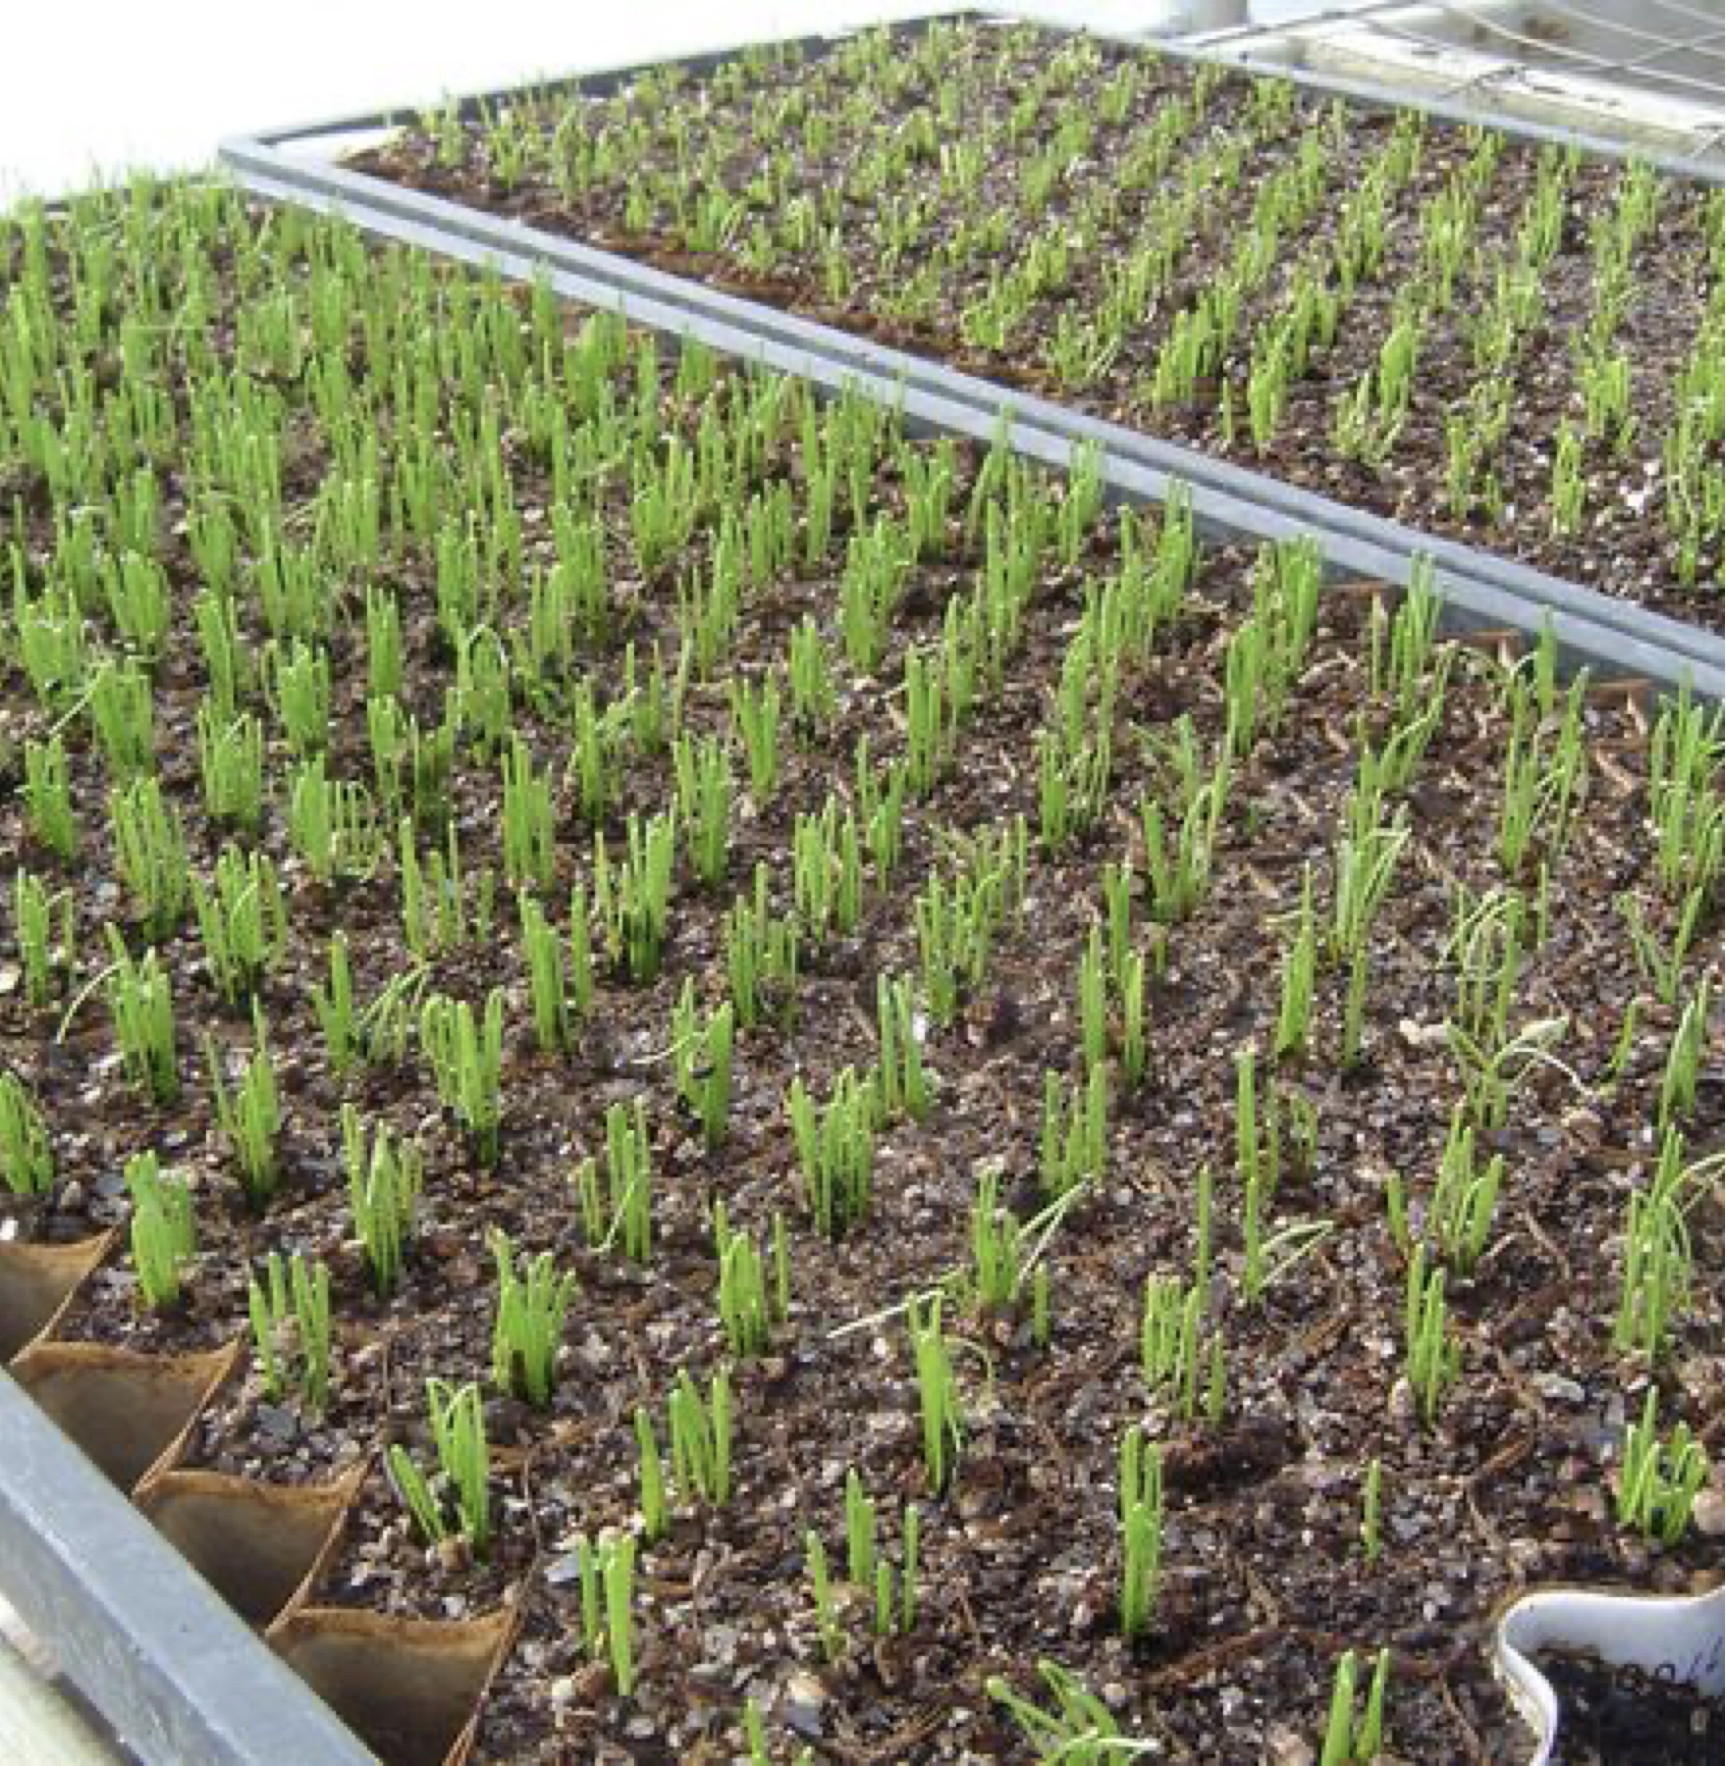
6. GERMINATION AND WATERING
- Once your tray is seeded, it needs to be thoroughly watered in order to ensure good germination. Make multiple passes with a watering wand or mister until full saturation is reached.
- If you are not using a germination chamber to maintain consistent moisture, a very light covering of potting mix or vermiculite may be used to cover the seeds, protecting them from drying out prior to germination.
- Ensure you can create an environment where the required germination temperature zone for your specific crop can be maintained. Paperpot germination domes and seedling heat mats can help to create the perfect germinating environment.
- Different crops will require different lengths of time in the nursery before seedlings are ready for transplanting. Refer to the “Days to Transplant” section in the Growers Notes for specifics (https://paperpot.co/paperpot-growers-notes/).
- 28 days from seeding is a good starting point for transplanting crops.
- In general, crops grown in paper pot chain will be more successful when transplanted sooner rather than later. If a crop is allowed to mature beyond what is recommended, the tops can become tangled or the roots can begin to grow together and can get tangled as well. Both will lead to a poor performance when attempting to run the Paperpot transplanter in the field.
7. PREPARE FOR TRANSPLANTING
- When the crop has reached the recommended stage of maturity and is ready for transplanting, heavily water the trays until they are fully saturated.
Note: Underwatered trays will lead to problems during transplanting. - Though optional, it is also beneficial to pre-water the trays with an organic liquid fertilizer for an added boost of fertility and more successful transplanting.
- Prior to loading the trays to be transplanted onto your garden cart for transport, remove the white strips of paper from the ends of the paper chain pots and discard them. They should come off easily without disturbing the brown paper chains.
8. BED PREPARATION FOR THE PAPERPOT TRANSPLANTER
- In general, loose, moist soils are best for Paperpot transplanting.
- Heavy soils should be amended or mechanically broken up.
- Wet soils should be allowed to dry out.
- You are shooting for soils that can flow, as opposed to those that clump or stick together in large chunks.
- Remove mulches, crop residue, and large root balls prior to transplanting. Large amounts of above- or belowground plant debris can make transplanting more difficult.
- Marking the desired number of rows in your bed, either with row markers on a bed prep rake or a grid spool, will ensure even spacing of your crops and provide a sight guide as you pull the Paperpot transplanter through the bed.
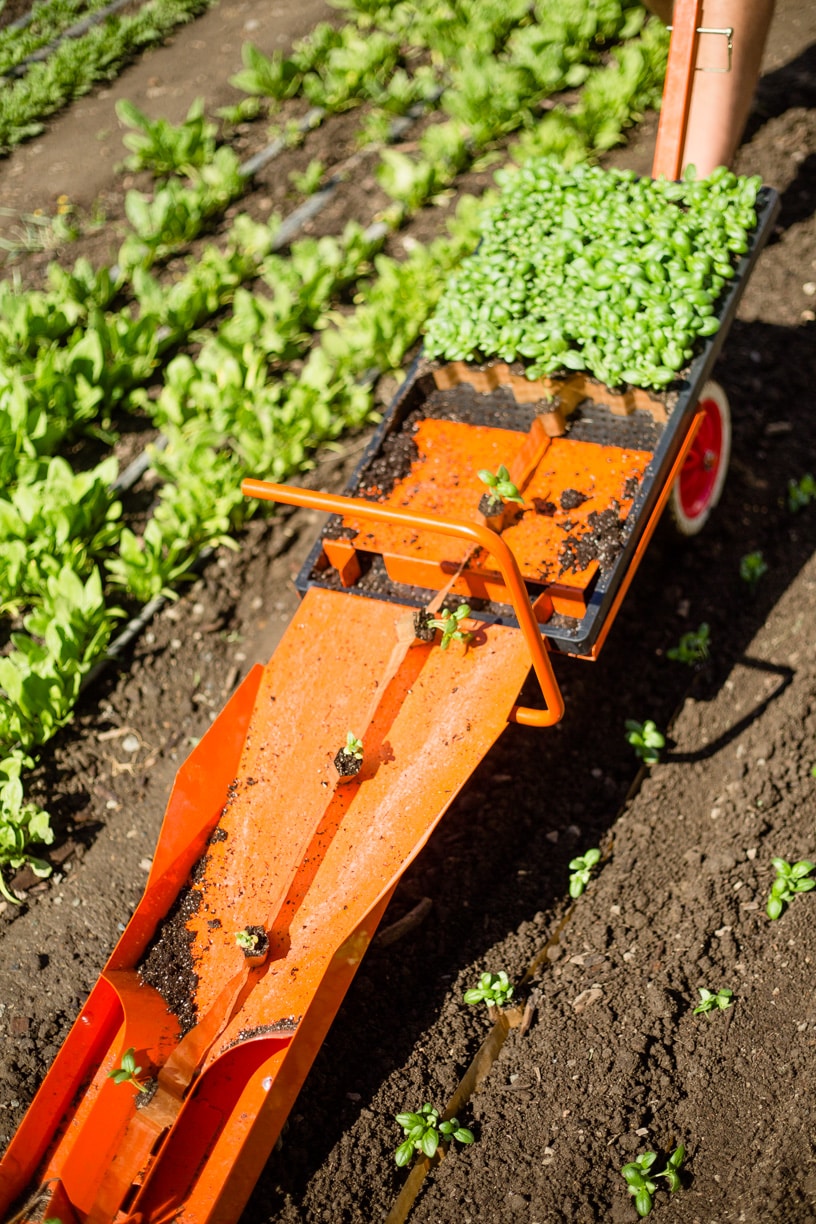
9. PAPERPOT TRANSPLANTING
- Place a tray of seedlings in the Paperpot transplanter, then slide the included metal ramp under the front edge of the paper chain pots. Slide the ramp completely into the tray with the two metal tabs pointing down and toward the front of the tray. This will create a ramp for the paper chain pots to go up and over the edge of the tray.
- Position the Paperpot transplanter in front of your first row to be planted, with the handle aiming down the bed and the tip of the plow underneath the transplanter at the front edge of the bed. This will put the tip of the transplanter extending out beyond the front edge of the bed.
- Pull the transplanter along your first row just until the whole transplanter is in the row, with the tip just past the edge of the bed. This allows the plow to create the furrow where the beginning of your paper chain pots will be planted.
- Use your hand to clear out a planting furrow at the tip of the transplanter (from the chute exit to the closing fins). This furrow is where you will lay the starting section of the paper chain.
- Locate the loose end of the paper chain and pull the first cell down through the main body of the Paperpot transplanter and into the furrow you just made. Stop before you get to the closing fins. Pin the first cell to the soil with a standard u-shaped landscape pin to hold it in place prior to pulling the transplanter through the bed.
- You are now ready to begin transplanting your first row. Pull the transplanter by the handle while walking in the aisle, with one eye on the front of the unit to ensure you are following your line and another eye on the back of the unit to ensure the paper chain pots are being dispensed smoothly and are buried at the correct level.
- We recommend pulling the transplanter from the left side of the bed while walking forward. This is much faster and more efficient than pulling while walking backwards and straddling the bed.
- When you have reached the end of a row, pull the transplanter beyond the back edge of the bed until the plow has reached the end of the bed.
- At this point you can slightly lift up on the handle while pulling to lay the last segment of paper chain pots into the furrow.
- When the last cell has reached the end of the bed, reach down and manually tear the paper chain pot.
- With one hand on the handle in the middle of the transplanter, and the other on the post that connects to the front handle, you can lift and rotate the transplanter to position it for the next row.
10. HOW TO ADJUST THE PAPERPOT TRANSPLANTER
- The handle height is adjustable. Waist height is generally the most comfortable for the operator.
- You can make slight adjustments to the Paperpot transplanter’s performance by applying downward or upward pressure to the handle as you pull the tool. Slightly lifting up while pulling the tool through the bed will lower the rear end of the transplanter, resulting in deeper planting, whereas pushing down will raise the rear end, resulting in a shallower planting. If greater adjustments are needed in regard to depth, you can raise or lower the adjustable front wheels until you reach your target depth. Your specific context and soil type will dictate these adjustments.
- The two rear wheels are designed to tamp and slightly compact the soil around the transplants after they’ve been laid into the furrow. If your soil is heavy clay or rocky, they may not be needed. If this is the case, they can be flipped to the up position, disabling their function.
- The two fins at the rear of the transplanter can also be adjusted for optimal performance. By loosening the bolts with a 10 mm wrench, they can be moved closer together or further apart. Moving the fins closer together will pull more soil around the base of the transplants, and pushing them farther apart will pull in less soil. The bend angle of the fins can also be increased or decreased to change the soil flow. Bending can be done by hand. In some extreme soil conditions with extremely fluffy-textured soil, the fins can be completely removed.
While we tried to standardize the procedure as much as possible, it may be necessary to change steps or timing based on local conditions.
If you have any questions, please reach out to us at hello@paperpot.co or 877.850.1555.
Interested in purchasing a Paperpot Transplanter? Click here