The Paperpot Transplanter System requires some time and experience before you really feel comfortable using it. It can also behave quite differently in different kinds of soil conditions and can take some time to figure out how to get it adjusted to your context.
In this article, we will be looking at three different hacks that may come in handy on your own farm, and what situations would make them useful:
- Removing the fins on your Paperpot Transplanter
- Seeding every other cell in your Paperpot Trays
- Team Planting with the Paperpot Transplanter
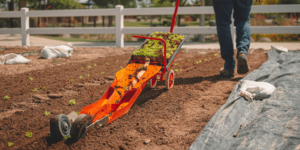
Hack #1: No Fins
When I started Winding Roads Farms in Petaluma, California, the plot I would be growing on was previously used to graze cattle. The ground was initially very compacted from grazing, but also very nitrogen-rich. The soil texture was extremely sandy, and a little low on organic material.
After tarping the plot for 6 months and allowing all of the native grasses to completely decompose, I shaped my raised beds in preparation for the first planting with the Paperpot Transplanter! When working the soil and creating my permanent raised beds, I was amazed at how fluffy the sandy loam was. Such a stark contrast to the heavy clay soil I had worked with while farming in Tennessee.
When my first crop of Salanova was ready for transplanting, I brought the Paperpot Transplanter out to the field with all adjustments still at factory preset. As I began planting the first row, I immediately noticed that the paper chains were getting buried way too deep into the soil.
Troubleshooting
After watching all of the videos I could find that related to paper chains getting buried too deep, and reading up on the issue, I came upon a few fixes that would hopefully help solve the problem.
The first fix said to lift up a little on the handle while pulling the transplanter. This small adjustment in operation would cause the plow underneath not to dig into the soil as deeply, creating a shallower trench for the transplants. It helped a little, but not too much.
The next adjustment I found was to extend the adjustable arm above the wheels, located under the handle of the transplanter. This increased the angle of the transplanter, bringing the furrower underneath higher out of the ground, making for a shallower trench when pulled through the soil. I continued increasing the adjustment above the wheels until they were at their fully extended position, putting the furrower at its shallowest position.
Still, the transplants were getting buried!
My third attempted fix was to spread apart the fins at the end of the tool. This required a 10mm socket to loosen up the bolts, allowing me to pull the fins as far apart as possible. I tried again. It was a little better, but they were STILL getting buried too deep!
If I had settled with these results, it would always require an extra step for me to go back and brush away the soil from around the transplants, ensuring the growth point wasn’t getting buried.
Removing the Fins
At that point I just wanted to be done with it, so I decided to remove the fins altogether. Sure enough, it worked! With fins gone, no soil was being pulled into the trench around the paper chains, but the soil was so fluffy that it was naturally falling in as the transplanter was pulled along.
Then the weight of the tamper wheels was just enough to push down the soil to be level with the top of the paper chain pots, but without burying the transplants–PERFECT!
Removing the fins was the solution for my context. While it may not be in yours, you now know the steps to work through to troubleshoot the process when transplants are getting buried too deep.
Hack #2: Skip Plates
Have you felt limited by the paper chain pots only coming in 2”, 4”, and 6” in-row spacing? Have you wanted to use the Paperpot system for crops with in-row spacings of 8”, 12”…or even 18”?
The good news is–you can!
Seeding every other cell in a 4” paper chain pot will give you 8” in-row spacing (great for crops like head lettuce), and every other cell in a 6” paper chain gives you 12” in-row spacing (good for early cabbage). Seeding every third cell in a 6” paper chain would give you 18” in-row spacing.
Here are some graphs to give you a good visual understanding of how cells in the paper chain pots are laid out, and how you would go about seeding every other cell:


Skip Plates
Seeding every other cell can be done by hand, but that becomes labor intensive and also negates all the time saved with the Paperpot system. Another option is using painter’s tape over every other hole in the top plate. This isn’t exactly ideal either, and also takes extra time.
As a solution to this, Paperpot Co. offers Skip Plates. Skip Plates are top plates for the Kwik Klik Drop Seeder that have been custom-made to seed every other cell in the paperpot tray.
8” in-row spacing (for crops like head lettuce) can be accomplished by seeding every other cell in 4” paper chain pots. 12” in row spacing (for crops like early cabbage) can be accomplished by seeding every other cell in 6” paper chain pots.
Better, More Efficient Workflow
If you want a quick, smooth workflow, and you’re regularly growing crops that require wider in-row spacing, your best bet would be to custom order the skip plates you need. Skip plates will guarantee fast and accurate seeding every time for those wider-spaced crops. Paperpot Co. can custom make Skip Plates for any size seed.
Hack #3: Team Planting
If you’ve ever used the Paperpot Transplanter, you know that using it is always a balance between looking where you are going and looking back on where you’ve been. While pulling the machine, you’re simultaneously (1) making sure that the paper chains are getting buried correctly, (2) that there aren’t any tears, (3) that the machine isn’t getting clogged, and (4) that you haven’t run out of paper chains.
But if you’ve got a crew on the farm, then you might want to try your hand at team planting.
Two Person Approach
Team planting is a two-person approach to quickly and efficiently transplant using the Paperpot Transplanter. Farmer John Hofer developed it at Wise Earth Farm in Kelowna, BC.
This approach splits up the responsibilities of running the Paperpot Transplanter, and in effect makes it twice as fast. Person 1 (the Operator) primarily focuses on pulling the transplanter through the bed, while Person 2 (the Feeder) walks behind and monitors everything else—making sure the machine isn’t getting clogged, ensuring the paper chains are going in properly, that there aren’t any tears in the chains, and keeping count of blanks (cells where there was failed germination).
The Feeder is also in charge of swapping out trays once the transplants have run out, which is another task that takes time when working with the Paperpot transplanter alone.
Another aspect of the team planting approach is that it also boosts the crew’s morale. While there are some people who prefer to work alone, many people enjoy doing team-based tasks, and the teamwork involved in this transplanting approach makes the task not only faster but more enjoyable.
Workflow
1. The Operator positions the transplanter at the beginning of the row.
2. The Feeder starts the chain, pulls it through the transplanter and into the chute, and holds it in place. This eliminates the need to use landscape pins or hand bury the beginning of the chain, which growers must do when working alone.
3. While the Operator walks down the row, the Feeder checks for blanks (empty cells where germination failed) and keeps a mental tally of how many they see.
4. Once they reach the end of the row, the Feeder communicates the number of blanks to the Operator, tears off the appropriate number of cells corresponding to the number of blanks, and leaves the paper chain at the end of the row.
5. After all rows have been planted, both the Operator and the Feeder work together to fill in the gaps before moving on to the next bed.
6. In case of a tray running out of transplants in the middle of a row, the Feeder breaks off to fetch another tray, ready to replace the old one as soon as it runs out.
7. Another task the Feeder can help with is starting a new row. When starting a new row with the Paperpot Transplanter the first couple of feet of the paper chain will often not get planted as deeply as the rest. This is due to the plow (or furrower) under the transplanter not being able to reach its full depth as it makes its way from the compacted path down into the loosened soil at the front of the bed. If the Feeder puts their weight down on the transplanter (just above the plow) and pushes down as the Operator begins to pull, this can help solve this problem.
Overall, this two-person method of transplanting worked especially well at Wise Earth Farm. If you think it might work for your context, then it’s definitely worth giving it a shot!
Conclusion
So there you have it–three interesting hacks that make using the Paperpot Transplanter easier: No fins, Skip Plates, and Team Planting! If you ever decide to try one (or all) of these hacks, let us know about it! We’d love to hear from you.
If you’ve got some Paperpot Transplanter hacks of your own, we’d also love for you to share them with us!
Relevant Links
Paperpot Transplanter Team Planting | How to Plant Garlic with the Paperpot Transplanter | Paperpot Transplanter: No Fins | Paperpot Farm Tools